Link to StumbleUpon

Showing posts with label preserving. Show all posts

Saturday, August 27, 2011

How to Pickle Beets

Pickling beets is easy. A little time consuming, but easy. I sowed beets for the first time this year and they grew extremely well, better than just about anything else in my garden. Trying new things in the garden and discovering a successful plant is great, but trying to figure out how to deal with a bumper crop can be a challenge.

There aren't many options when confronted with a few dozen pounds of fresh beets. Like most root crops, beets store very well and can last for months in a cool, damp medium, but even then they have a finite shelf life. Pickling can extend that shelf life dramatically.

Beets in the garden

For eating, most sources recommend beets be harvested while still quite small. For pickling, you can get away with beets being a little larger. Three-inch beets fit canning jars very well. Fresh beets should be pickled; throw any limp or soft ones in the compost pile.

A portion of my beet harvest

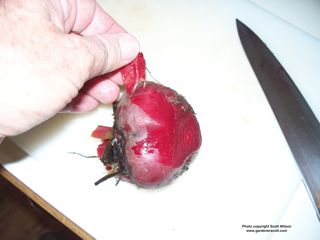
After selecting and harvesting your beets, wash and scrub them well. Cut off the greens leaving one to two inches of the stems in place. Leave the root intact or trim off just the end to minimize the red bleeding out.

Preparing a beet

Put the beets in a large pot, cover with water, and boil for 30 to 45 minutes; less for small beets, more for larger. Beets are quite dense and boiling helps soften them for the pickling process.

Boiling beets

After boiling, place them in an ice bath or rinse with cold water. This makes it easy to remove the skins, which is an important step. Cut the stems and roots off and remove the skin. You can peel the skin with your fingers, rub the beet with a paper towel, or use a soft cloth. Your fingers will get red from residual juice but it washes off easily.

Removing skin is easy

After the beets are cooked and skinned, cut them into slices about 1/4 inch thick and place them in a pot of hot pickling solution.

Sliced beets added to pickling solution

The pickling juice is a basic ratio of two parts vinegar, one part water, one part sugar, and spices of your choosing. For about six pounds of beets use four cups vinegar, two cups water, and two cups of sugar. You can add three or four tablespoons of pickling spice; or 4-8 cinnamon sticks and 10-12 whole cloves; or onion slices, cinnamon sticks, cloves, and 10-12 allspice nuts; or three to four tablespoons of caraway seeds and one or two tablespoons of whole black peppercorns. You can either place the spices directly in the liquid or wrap them in cheesecloth or a spice bag. When using a bag, the spices infuse their flavor into the solution and then you remove them. If you leave them in the liquid they'll continue releasing flavor during the pickling process which can make for more intense spiciness.

After combining the vinegar, water, sugar, and spices, bring the solution to a boil over medium heat and boil gently for 10 to 15 minutes. Discard the bag, if using one. Add the sliced beets and return the mixture to a boil.

Using a slotted spoon, place the beets in prepared, hot, canning jars, leaving at least 1/2 inch of space at the top. Ladle in hot pickling juice, leaving 1/2 inch headspace. Use a plastic tool or spoon to remove air bubbles and add more liquid as necessary to maintain 1/2 inch headspace. Wipe the rim of the jar with a moist paper towel, place a lid on the jar, and secure it finger-tight with the band.

Beets in jar

Place jars in your canner making sure they're completely covered by water. They'll be processed for a long time so I recommend at least two inches of water covering them. Bring the water to a full boil (covering the pot helps) and begin timing. Process for 30 minutes, or up to 45 minutes for people like me who live above 6,000 feet. After processing, turn off heat, let the jars rest for about five minutes, and remove them. Place them in a draft-free spot overnight and check the seal the next day.

Finished jars looking good

Pickled beets will last for many months on the shelf and look beautiful in the jars. They're a great way to enjoy your harvest throughout the year and they make great gifts. Like most things from the garden, personally preserved products taste better than the mass-produced foods you buy in the store.
Pickling beets is easy. A little time consuming, but easy. I sowed beets for the first time this year and they grew extremely well, better than just about anything else in my garden. Trying new things in the garden and discovering a successful plant is great, but trying to figure out how to deal with a bumper crop can be a challenge.

There aren't many options when confronted with a few dozen pounds of fresh beets. Like most root crops, beets store very well and can last for months in a cool, damp medium, but even then they have a finite shelf life. Pickling can extend that shelf life dramatically.

Beets in the garden

For eating, most sources recommend beets be harvested while still quite small. For pickling, you can get away with beets being a little larger. Three-inch beets fit canning jars very well. Fresh beets should be pickled; throw any limp or soft ones in the compost pile.

A portion of my beet harvest

After selecting and harvesting your beets, wash and scrub them well. Cut off the greens leaving one to two inches of the stems in place. Leave the root intact or trim off just the end to minimize the red bleeding out.

Preparing a beet

Put the beets in a large pot, cover with water, and boil for 30 to 45 minutes; less for small beets, more for larger. Beets are quite dense and boiling helps soften them for the pickling process.

Boiling beets

After boiling, place them in an ice bath or rinse with cold water. This makes it easy to remove the skins, which is an important step. Cut the stems and roots off and remove the skin. You can peel the skin with your fingers, rub the beet with a paper towel, or use a soft cloth. Your fingers will get red from residual juice but it washes off easily.

Removing skin is easy

After the beets are cooked and skinned, cut them into slices about 1/4 inch thick and place them in a pot of hot pickling solution.

Sliced beets added to pickling solution

The pickling juice is a basic ratio of two parts vinegar, one part water, one part sugar, and spices of your choosing. For about six pounds of beets use four cups vinegar, two cups water, and two cups of sugar. You can add three or four tablespoons of pickling spice; or 4-8 cinnamon sticks and 10-12 whole cloves; or onion slices, cinnamon sticks, cloves, and 10-12 allspice nuts; or three to four tablespoons of caraway seeds and one or two tablespoons of whole black peppercorns. You can either place the spices directly in the liquid or wrap them in cheesecloth or a spice bag. When using a bag, the spices infuse their flavor into the solution and then you remove them. If you leave them in the liquid they'll continue releasing flavor during the pickling process which can make for more intense spiciness.

After combining the vinegar, water, sugar, and spices, bring the solution to a boil over medium heat and boil gently for 10 to 15 minutes. Discard the bag, if using one. Add the sliced beets and return the mixture to a boil.

Using a slotted spoon, place the beets in prepared, hot, canning jars, leaving at least 1/2 inch of space at the top. Ladle in hot pickling juice, leaving 1/2 inch headspace. Use a plastic tool or spoon to remove air bubbles and add more liquid as necessary to maintain 1/2 inch headspace. Wipe the rim of the jar with a moist paper towel, place a lid on the jar, and secure it finger-tight with the band.

Beets in jar

Place jars in your canner making sure they're completely covered by water. They'll be processed for a long time so I recommend at least two inches of water covering them. Bring the water to a full boil (covering the pot helps) and begin timing. Process for 30 minutes, or up to 45 minutes for people like me who live above 6,000 feet. After processing, turn off heat, let the jars rest for about five minutes, and remove them. Place them in a draft-free spot overnight and check the seal the next day.

Finished jars looking good

Pickled beets will last for many months on the shelf and look beautiful in the jars. They're a great way to enjoy your harvest throughout the year and they make great gifts. Like most things from the garden, personally preserved products taste better than the mass-produced foods you buy in the store.

Wednesday, June 22, 2011

Preserve Your Garden in Jelly

Making jelly is one of my favorite activities and making jelly from my own harvest is about as good as it gets. I use the term broadly to encompass jam as well. I've made jam or jelly from my garden's grapes, apples, apricots, elderberries, raspberries, blackberries, strawberries, rhubarb, and even red bell peppers. It's easy and something every gardener should consider trying.

A beautiful batch of jelly

While growing your own produce is nice, farmer's markets abound during the summer and you don't need to rely on your own fruit production to enjoy the sweet flavors that jelly offers. We tend to buy with the intent to eat, and we often buy more than we need. A bushel of fresh peaches is hard to pass up when you grab a single fuzzy orb and smell the rich, ripe aromas bursting from it. Before you know it a few days have gone by and you're stuffed from the peaches you put in pie, on your ice cream, and in your oatmeal. There are always too many peaches left in the box that are bruised, squishy, or getting too ripe. The compost pile is usually their final resting place, but the jelly jar may be a better solution.

While fruit that you make into jam and jelly shouldn't be rotten, it can be bruised and squishy. Even overripe is okay. In a home garden it may be tough harvesting enough fruit for preserving in a single day, but over the course of a few days you can collect enough. While the physical quality may not be supreme for older fruit, it can be made into wonderful jellies.

Part of the process of making jelly is to cut and cook the fruit. By the time it has simmered in a pot, all of it is reduced to a slurry that reveals no bruising or unsightly dents, just fruity goodness.

Peaches in the pot

The main difference between jelly and jam is whether it has fruit in it or not. After you simmer the fruit it can take two courses:  to be put into a strainer or jelly bag that separates the juice from solid pulp so the juice can be made into jelly; or to remain in the pot and become jam. Jelly is made from just the fruit juice and jam is made with juice and pieces of fruit.

I do both and have favorites. I prefer grape jelly to grape jam, but I like strawberry jam more than strawberry jelly. Rhubarb jelly and elderberry jelly are better than the jams they make while blackberry and raspberry jams are better than their jellies. A lot of it comes down to texture and appearance, but at its core it's all about personal preference and each individual can decide what they prefer.

My peach jelly, jam, and marmalade

I encourage gardeners to make jellies because it's easy, cost-effective, and gives them an opportunity to enjoy their garden (or the farmer's market) at any time of year. In about an hour you can have six or seven jars of jelly that are less expensive than what you buy in the store and taste far superior.

The process is very basic. Take fruit, add packaged pectin, sugar, and maybe a little lemon juice, heat it in a pot, ladle it into jars, heat the jars, put a lid on the jars, and then store them in the pantry until you're ready to enjoy the delicious results.

Recipes for making jelly should always be used; don't wing it. The Ball company (maker of pectin, jars, and lids) produces the "Ball Blue Book", a great resource that shows you every step in the process and includes many great recipes. It should be a part of every gardener's library.

The reason that approved recipes (approved by the USDA, Extension service, or major manufacturer) should be used is all about food safety. Your grandmother's recipe may taste good, but it may not have enough sugar or acid to keep harmful bacteria out. We've learned a lot about food preservation in recent years and you don't need to worry about harming your family or yourself as long as you follow prescribed methods and formulas.

It helps to see someone else make jelly before you try it for the first time so I've made a video to help. It's a little intimidating the first time you do it but before long you'll become a pro. Making jam as a beginner is a little easier because you don't have the extra step of collecting the juice from the fruit, but both products are easy to make.

If you haven't made jelly before you should try it. If you have, you should keep doing it. While I love my compost pile, I'd rather see delicious fruit in a jelly jar than decomposing on the pile.

Take a look at my video:


Link to my YouTube video on making jelly.
Making jelly is one of my favorite activities and making jelly from my own harvest is about as good as it gets. I use the term broadly to encompass jam as well. I've made jam or jelly from my garden's grapes, apples, apricots, elderberries, raspberries, blackberries, strawberries, rhubarb, and even red bell peppers. It's easy and something every gardener should consider trying.

A beautiful batch of jelly

While growing your own produce is nice, farmer's markets abound during the summer and you don't need to rely on your own fruit production to enjoy the sweet flavors that jelly offers. We tend to buy with the intent to eat, and we often buy more than we need. A bushel of fresh peaches is hard to pass up when you grab a single fuzzy orb and smell the rich, ripe aromas bursting from it. Before you know it a few days have gone by and you're stuffed from the peaches you put in pie, on your ice cream, and in your oatmeal. There are always too many peaches left in the box that are bruised, squishy, or getting too ripe. The compost pile is usually their final resting place, but the jelly jar may be a better solution.

While fruit that you make into jam and jelly shouldn't be rotten, it can be bruised and squishy. Even overripe is okay. In a home garden it may be tough harvesting enough fruit for preserving in a single day, but over the course of a few days you can collect enough. While the physical quality may not be supreme for older fruit, it can be made into wonderful jellies.

Part of the process of making jelly is to cut and cook the fruit. By the time it has simmered in a pot, all of it is reduced to a slurry that reveals no bruising or unsightly dents, just fruity goodness.

Peaches in the pot

The main difference between jelly and jam is whether it has fruit in it or not. After you simmer the fruit it can take two courses:  to be put into a strainer or jelly bag that separates the juice from solid pulp so the juice can be made into jelly; or to remain in the pot and become jam. Jelly is made from just the fruit juice and jam is made with juice and pieces of fruit.

I do both and have favorites. I prefer grape jelly to grape jam, but I like strawberry jam more than strawberry jelly. Rhubarb jelly and elderberry jelly are better than the jams they make while blackberry and raspberry jams are better than their jellies. A lot of it comes down to texture and appearance, but at its core it's all about personal preference and each individual can decide what they prefer.

My peach jelly, jam, and marmalade

I encourage gardeners to make jellies because it's easy, cost-effective, and gives them an opportunity to enjoy their garden (or the farmer's market) at any time of year. In about an hour you can have six or seven jars of jelly that are less expensive than what you buy in the store and taste far superior.

The process is very basic. Take fruit, add packaged pectin, sugar, and maybe a little lemon juice, heat it in a pot, ladle it into jars, heat the jars, put a lid on the jars, and then store them in the pantry until you're ready to enjoy the delicious results.

Recipes for making jelly should always be used; don't wing it. The Ball company (maker of pectin, jars, and lids) produces the "
Ball Blue Book", a great resource that shows you every step in the process and includes many great recipes. It should be a part of every gardener's library.

The reason that approved recipes (approved by the USDA, Extension service, or major manufacturer) should be used is all about food safety. Your grandmother's recipe may taste good, but it may not have enough sugar or acid to keep harmful bacteria out. We've learned a lot about food preservation in recent years and you don't need to worry about harming your family or yourself as long as you follow prescribed methods and formulas.

It helps to see someone else make jelly before you try it for the first time so I've made a video to help. It's a little intimidating the first time you do it but before long you'll become a pro. Making jam as a beginner is a little easier because you don't have the extra step of collecting the juice from the fruit, but both products are easy to make.

If you haven't made jelly before you should try it. If you have, you should keep doing it. While I love my compost pile, I'd rather see delicious fruit in a jelly jar than decomposing on the pile.

Take a look at my video:


Link to my YouTube video on making jelly.

Friday, April 15, 2011

Selecting Plants for Food Preserving

When asked why they grow fruits and vegetables, most gardeners would probably answer with something akin to, "Because I want to eat them." There's little debate in recognizing that we grow food crops to eat. But what do you do when the plants produce more than you, your family, and even your friends can eat? I hope there are only three top answers: preserve it for later eating; donate it to a food charity; compost it.

As a Master Food Preserver, I advocate preserving food at every opportunity. I'm referring to canning, pickling, dehydrating, and freezing as your primary options. Rather than waiting to see what you have left over before you think about preserving, I suggest you plan some of your garden activities with preservation in mind. Grow to preserve.

I grow four specific crops with food preservation as my primary goal. My wife and daughter love my pickled green beans (that's not news to loyal followers; see my blog: "Your Garden in a Pickle") so I plant an entire bed of green beans devoted to a tasty end in the pickle jar. I'll continue that tradition this year and expand it by planting a new variety of purple-striped green beans. We may eat a few of the beans after harvest, but the large majority will be pickled.

Pickling green beans.

My grape jelly is a huge hit as a Christmas present for family and friends. In my old garden, two Concord grape vines allowed me to make as many as 36 jars of grape jelly in a typical year. One of the first things I did when I established my new garden last year was to plant grape vines. It will still be a few years before the new vines produce enough fruit to make jelly, but that's the reason they're in my garden.

Pre-jelly grapes.

Tomatoes are one of my favorite crops and I use them fresh in salsa, pasta sauces, and salads. The six to 12 tomato plants I put in my beds each year produce far more fruit than can be eaten fresh. The reason I plant so many is so that there will be plenty of juicy tomatoes to can. Canned tomatoes may not work well in a salad, but they're perfect for salsa and sauce. Making a fresh salsa in January or February with tomatoes from my own garden is a special pleasure.

There are varieties of cucumber that are bred specifically for pickling and I grow them. They taste good when eaten fresh, but they taste better when pickled along with some of the dill in my herb garden. I also add some of the garlic and hot peppers that I grow, for a little extra zing in each crunchy bite. Homemade pickles are a wonderful thing.

There are other plants in my garden that I grow for the preservation option too. When I harvest the raspberries, it seems that few make it to the house; they're too delectable to pass up. Those that make it to the kitchen are eaten by the handful, added to yogurt, or sprinkled on ice cream and other desserts, but in banner harvest years there are enough left over to freeze for future desserts or to make into raspberry jam. The same holds true for my blackberries and strawberries.

My fruit trees serve a dual purpose too. The apples, apricots, plums, and cherries are grown to enjoy fresh, but when they produce enough fruit they end up in the pickle or jam jar. Yes, I mentioned pickles when talking about fruit. Pickled apples, pear, and peaches are very tasty.

Making apricots into jam.

Though garlic, onions, and potatoes are not technically preserved after harvest, they are grown for later use. You store them in a cool, dry place so that you can use them long after the snows begin to fall.

I also have to add herbs to this list. While I pick fresh herbs for use in the kitchen, I always harvest every last leaf before bitter cold hits. After drying the herbs, they're available in the kitchen throughout the winter until fresh ones appear in the spring.

What do you grow that could or should be preserved? Everything I've mentioned is easily preserved. How about carrots, cauliflower, broccoli, and zucchini? They can be pickled individually or together, especially at the end of the season when you have small amounts of each. I've also pickled jalapeno and banana peppers.

Try planting a variety of bean that can be dried and stored; I'm doing that this year. When you have leftover pumpkins after Halloween, cut and freeze the flesh for pumpkin pie, soup, or ice cream. When you have bushels of zucchini and no one left to unload them on, freeze them for making bread or stew. Think about planting similar squash plants specifically to freeze and use later.

Too much garden produce ends up unused. Too few gardeners preserve, donate, or compost their extra harvest. When you plant your first seed or potted plant with a specific use in mind, you're helping to eliminate waste. I support planting a row for the hungry. I encourage you to compost everything that can be composted. Food preservation is another option that should be part of your planning.
When asked why they grow fruits and vegetables, most gardeners would probably answer with something akin to, "Because I want to eat them." There's little debate in recognizing that we grow food crops to eat. But what do you do when the plants produce more than you, your family, and even your friends can eat? I hope there are only three top answers: preserve it for later eating; donate it to a food charity; compost it.

As a Master Food Preserver, I advocate preserving food at every opportunity. I'm referring to canning, pickling, dehydrating, and freezing as your primary options. Rather than waiting to see what you have left over before you think about preserving, I suggest you plan some of your garden activities with preservation in mind. Grow to preserve.

I grow four specific crops with food preservation as my primary goal. My wife and daughter love my pickled green beans (that's not news to loyal followers; see my blog: "
Your Garden in a Pickle") so I plant an entire bed of green beans devoted to a tasty end in the pickle jar. I'll continue that tradition this year and expand it by planting a new variety of purple-striped green beans. We may eat a few of the beans after harvest, but the large majority will be pickled.

Pickling green beans.

My grape jelly is a huge hit as a Christmas present for family and friends. In my old garden, two Concord grape vines allowed me to make as many as 36 jars of grape jelly in a typical year. One of the first things I did when I established my new garden last year was to plant grape vines. It will still be a few years before the new vines produce enough fruit to make jelly, but that's the reason they're in my garden.

Pre-jelly grapes.

Tomatoes are one of my favorite crops and I use them fresh in salsa, pasta sauces, and salads. The six to 12 tomato plants I put in my beds each year produce far more fruit than can be eaten fresh. The reason I plant so many is so that there will be plenty of juicy tomatoes to can. Canned tomatoes may not work well in a salad, but they're perfect for salsa and sauce. Making a fresh salsa in January or February with tomatoes from my own garden is a special pleasure.

There are varieties of cucumber that are bred specifically for pickling and I grow them. They taste good when eaten fresh, but they taste better when pickled along with some of the dill in my herb garden. I also add some of the garlic and hot peppers that I grow, for a little extra zing in each crunchy bite. Homemade pickles are a wonderful thing.

There are other plants in my garden that I grow for the preservation option too. When I harvest the raspberries, it seems that few make it to the house; they're too delectable to pass up. Those that make it to the kitchen are eaten by the handful, added to yogurt, or sprinkled on ice cream and other desserts, but in banner harvest years there are enough left over to freeze for future desserts or to make into raspberry jam. The same holds true for my blackberries and strawberries.

My fruit trees serve a dual purpose too. The apples, apricots, plums, and cherries are grown to enjoy fresh, but when they produce enough fruit they end up in the pickle or jam jar. Yes, I mentioned pickles when talking about fruit. Pickled apples, pear, and peaches are very tasty.

Making apricots into jam.

Though garlic, onions, and potatoes are not technically preserved after harvest, they are grown for later use. You store them in a cool, dry place so that you can use them long after the snows begin to fall.

I also have to add herbs to this list. While I pick fresh herbs for use in the kitchen, I always harvest every last leaf before bitter cold hits. After drying the herbs, they're available in the kitchen throughout the winter until fresh ones appear in the spring.

What do you grow that could or should be preserved? Everything I've mentioned is easily preserved. How about carrots, cauliflower, broccoli, and zucchini? They can be pickled individually or together, especially at the end of the season when you have small amounts of each. I've also pickled jalapeno and banana peppers.

Try planting a variety of bean that can be dried and stored; I'm doing that this year. When you have leftover pumpkins after Halloween, cut and freeze the flesh for pumpkin pie, soup, or ice cream. When you have bushels of zucchini and no one left to unload them on, freeze them for making bread or stew. Think about planting similar squash plants specifically to freeze and use later.

Too much garden produce ends up unused. Too few gardeners preserve, donate, or compost their extra harvest. When you plant your first seed or potted plant with a specific use in mind, you're helping to eliminate waste. I support planting a row for the hungry. I encourage you to compost everything that can be composted. Food preservation is another option that should be part of your planning.

Thursday, March 3, 2011

Gardening and Preserving

Why do you garden? Is it for the flowers, the fruit, the physical activity? Just as you should have a garden plan before you buy your seeds and plants, you should have a goal plan before you begin gardening. You can approach gardening in a haphazard manner where you just handle the task directly in front of you as you stumble down the garden path or you can view it as an opportunity to impact your household for months and years to come. One of these opportunities is to plant with your harvest in mind.

Envision the herbs, vegetables, and fruits that will reward your efforts. I think almost all of us can agree that produce picked fresh from the garden surpasses store-bought options in just about every category. Taste, appearance, freshness, and choice are always better in a home garden. With proper planning, cultivation, and care, your harvest will be overflowing. Then what?

Do you have a plan for that abundance? Do you eat as many fresh vegetables as you can and then end up dumping bushels in the compost pile because you can't eat any more? Do you leave bags of zucchini on your neighbors' doorsteps in the dead of night? Do you leave fruit withering on the tree because you don't have any place to store it? Or do you preserve?

What to do with all of these plums?

Preserving herbs, vegetables, and fruits is easy, inexpensive, and carries the tastes of the harvest well into the winter. I choose what I plant with preservation in mind and recommend you do the same.

Much of my personal focus is on jams and jellies. I'm a certified Master Food Preserver and marry those skills with my gardening. I've taught many classes on canning, dehydrating, and jelly making to show the average person that the process of processing is not hard. Gardening and preserving go hand in hand.

I grow strawberries because they're relatively easy, taste great fresh from the garden, and are wonderful in jam. When the strawberries begin to ripen they do so quickly and you can suddenly have pounds of them in a few, short days. Too many to eat so quickly, it only takes a few pounds to make a few pint jars of strawberry jam.

My two Concord grape vines would give me close to 25 pounds of fruit, all ready to pick in the same week. The birds enjoyed many of the luscious berries, but that still left a lot for me. Too much to eat, turning the grapes into grape juice provided the base for dozens of jars of Concord grape jelly.

Getting juice from my grapes.

With a large garden, it's difficult not to grow multiple tomato plants. In a good year the tomatoes ripen and are ready to pick by the bushel. There are many to give as gifts to family and friends and many to savor myself. It's painful to see a single tomato go to waste after all of the effort to get them to harvest. A few quart jars, a big pot of water, and a few hours in the afternoon, and I'll have canned tomatoes that will last until the next harvest, assuming they're not eaten first.

Dehydrating offers options too. I grow chile peppers with dehydrating in mind; after drying they keep for a long time and are easy to throw into a big pot of chili. Almost all of my herbs are dried at harvest; I am still using the thyme, rosemary, oregano, sage, tarragon, and peppermint from last year's harvest.

Pickling is one of my favorite things to do. I've mentioned before about my green beans and their sole purpose -- to be pickled. My wife and I met and ultimately married because she loved my pickled green beans (there were other reasons too). Turning your cucumbers into pickles and your cabbage into sauerkraut is easy to do.

Making pickled green beans.

Many of my plant choices are preservation based. I grow rhubarb to pair with the strawberries in pie and in jelly. I grow raspberries and blackberries for the jam. All of my fruit trees are because of the potential jams and jellies; the taste of plum jam and apricot jam made from my own fruit far exceeded anything you can buy. My peppers aren't only dried, they're pickled too. Tomatoes, garlic, onions, peppers, and cilantro have all been harvested in my garden to make salsa, which is frozen or canned.

One year's preserved harvest.

Almost everything you can grow in your herb, vegetable, and fruit gardens can be preserved. If you haven't thought about food preservation before, think about it for this season. Knowing you can save some of your harvest might open you up to new growing opportunities.

Local Extension offices usually offer classes in preserving food. You can find many online resources like these from Colorado State University. No home should be without the "Ball Blue Book", a great preservation guide from the Ball Corporation, the company that makes many of the jars and supplies for canning.

I'll talk more about specific preservation subjects in days ahead. Most of it is so easy you can teach yourself with a little guidance from a book or advisor. For now, think about the plants you plan to grow and how you can preserve them. Also think about what plants you would like to grow, if you could preserve them. Incorporate preservation into your garden planning.
Why do you garden? Is it for the flowers, the fruit, the physical activity? Just as you should have a garden plan before you buy your seeds and plants, you should have a goal plan before you begin gardening. You can approach gardening in a haphazard manner where you just handle the task directly in front of you as you stumble down the garden path or you can view it as an opportunity to impact your household for months and years to come. One of these opportunities is to plant with your harvest in mind.

Envision the herbs, vegetables, and fruits that will reward your efforts. I think almost all of us can agree that produce picked fresh from the garden surpasses store-bought options in just about every category. Taste, appearance, freshness, and choice are always better in a home garden. With proper planning, cultivation, and care, your harvest will be overflowing. Then what?

Do you have a plan for that abundance? Do you eat as many fresh vegetables as you can and then end up dumping bushels in the compost pile because you can't eat any more? Do you leave bags of zucchini on your neighbors' doorsteps in the dead of night? Do you leave fruit withering on the tree because you don't have any place to store it? Or do you preserve?

What to do with all of these plums?

Preserving herbs, vegetables, and fruits is easy, inexpensive, and carries the tastes of the harvest well into the winter. I choose what I plant with preservation in mind and recommend you do the same.

Much of my personal focus is on jams and jellies. I'm a certified Master Food Preserver and marry those skills with my gardening. I've taught many classes on canning, dehydrating, and jelly making to show the average person that the process of processing is not hard. Gardening and preserving go hand in hand.

I grow strawberries because they're relatively easy, taste great fresh from the garden, and are wonderful in jam. When the strawberries begin to ripen they do so quickly and you can suddenly have pounds of them in a few, short days. Too many to eat so quickly, it only takes a few pounds to make a few pint jars of strawberry jam.

My two Concord grape vines would give me close to 25 pounds of fruit, all ready to pick in the same week. The birds enjoyed many of the luscious berries, but that still left a lot for me. Too much to eat, turning the grapes into grape juice provided the base for dozens of jars of Concord grape jelly.

Getting juice from my grapes.

With a large garden, it's difficult not to grow multiple tomato plants. In a good year the tomatoes ripen and are ready to pick by the bushel. There are many to give as gifts to family and friends and many to savor myself. It's painful to see a single tomato go to waste after all of the effort to get them to harvest. A few quart jars, a big pot of water, and a few hours in the afternoon, and I'll have canned tomatoes that will last until the next harvest, assuming they're not eaten first.

Dehydrating offers options too. I grow chile peppers with dehydrating in mind; after drying they keep for a long time and are easy to throw into a big pot of chili. Almost all of my herbs are dried at harvest; I am still using the thyme, rosemary, oregano, sage, tarragon, and peppermint from last year's harvest.

Pickling is one of my favorite things to do. I've mentioned before about my green beans and their sole purpose -- to be pickled. My wife and I met and ultimately married because she loved my pickled green beans (there were other reasons too). Turning your cucumbers into pickles and your cabbage into sauerkraut is easy to do.

Making pickled green beans.

Many of my plant choices are preservation based. I grow rhubarb to pair with the strawberries in pie and in jelly. I grow raspberries and blackberries for the jam. All of my fruit trees are because of the potential jams and jellies; the taste of plum jam and apricot jam made from my own fruit far exceeded anything you can buy. My peppers aren't only dried, they're pickled too. Tomatoes, garlic, onions, peppers, and cilantro have all been harvested in my garden to make salsa, which is frozen or canned.

One year's preserved harvest.

Almost everything you can grow in your herb, vegetable, and fruit gardens can be preserved. If you haven't thought about food preservation before, think about it for this season. Knowing you can save some of your harvest might open you up to new growing opportunities.

Local Extension offices usually offer classes in preserving food. You can find many online resources like
these from Colorado State University. No home should be without the "Ball Blue Book", a great preservation guide from the Ball Corporation, the company that makes many of the jars and supplies for canning.

I'll talk more about specific preservation subjects in days ahead. Most of it is so easy you can teach yourself with a little guidance from a book or advisor. For now, think about the plants you plan to grow and how you can preserve them. Also think about what plants you would like to grow, if you could preserve them. Incorporate preservation into your garden planning.

Tuesday, October 19, 2010

Tea in the Garden II

Herbs are a great addition to any garden. They're easy to grow in a small plot or pot, add fragrance and texture to the landscape, and offer you a ticket to many culinary adventures. For me, few things are as enjoyable as a walk to my herb garden to snip off a little fresh parsley, sage, rosemary, and thyme, and toss it all into a pot of simmering tomatoes. Who knew that Simon and Garfunkel were singing about a recipe for spaghetti sauce.

In the next few days I'll harvest my sage, rosemary, and thyme, along with oregano and tarragon. After they're finished drying, I'll crumble them and fill the little glass bottles that already have printed labels on them. Those are the bottles of mass-produced herbs that I bought at the grocery store years ago. I've reused the bottles over and over again to hold my own herbs. I don't remember the last time our household purchased those common herbs; each year's harvest is enough to sustain us through the winter until fresh herbs sprout again.

This is a pattern I've followed season after season. When the tomato or pepper production suffered, the herbs were always providing useful crops. When the pumpkins or corn failed to produce adequate quantities, the herbs offered a glimmer of success. This year I decided to expand on that dependability and branch out a little.

Peparing the herbs for drying.
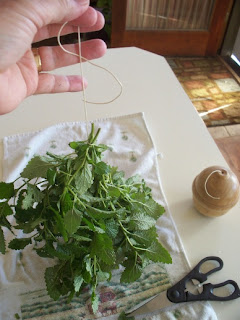
A few weeks ago I harvested bunches of peppermint and lemon balm. I washed them, tied them into small bundles, and hung them to dry in a clean corner of our guest room. Today I took a few sprigs of the dried peppermint, crushed the leaves, and tucked them into my tea ball. After a healthy splash of hot water and a few minutes of steeping, I was rewarded with a fresh cup of peppermint tea. A very good cup of peppermint tea.

Just up the road from us in Boulder, Colorado, is the Celestial Seasonings tea factory. Every bag of Celestial Seasonings tea that you buy in this country is produced at that plant. They offer free tours and one of the highlights is the mint room. The fragrant oils in mint are so powerful that they'll affect the taste of the other tea ingredients stored in the warehouse so they store the mint in its own separate room. It's an overwhelming experience and one that will clear out your sinuses for weeks to come.

A mid-winter delight, when snow blankets the ground, is to sit in front of the fire with my wife and sip a hot cup of mint tea. Traditionally it's a Celestial Seasonings mint tea because we always seem to come home with boxes of it after visiting the factory. The cup I made today, with my own leaves, tasted just like that mid-winter brew. Actually, it tasted a little better because it was from my garden.

I certainly don't intend to put the company out of business and I'll continue to buy many of their other blends, but I was able to replicate one of their successes with one of my own. It felt good.

Mint has been part of my garden for years, but it was usually used as a garnish. In years past I intended to use it for tea, but other gardening chores always seemed to have a higher priority. I grew chamomile for the purpose of making tea, but that fell short too. This year, with focus and determination, I finally fulfilled the goal I set of making a cup of tea from my own harvest. It will be the first of many.

Too often we have plans for our plants and then time and weather intervene and upset the cart. The little successes are what makes gardening so enjoyable and I suggest you find as many successes as you can. Herbs can be the conduit to continued success. I'll continue to experiment with herb blends for tea and see what happens. That's how Celestial Seasonings started. Who knows where it will lead me or you, if you do the same.
Herbs are a great addition to any garden. They're easy to grow in a small plot or pot, add fragrance and texture to the landscape, and offer you a ticket to many culinary adventures. For me, few things are as enjoyable as a walk to my herb garden to snip off a little fresh parsley, sage, rosemary, and thyme, and toss it all into a pot of simmering tomatoes. Who knew that Simon and Garfunkel were singing about a recipe for spaghetti sauce.

In the next few days I'll harvest my sage, rosemary, and thyme, along with oregano and tarragon. After they're finished drying, I'll crumble them and fill the little glass bottles that already have printed labels on them. Those are the bottles of mass-produced herbs that I bought at the grocery store years ago. I've reused the bottles over and over again to hold my own herbs. I don't remember the last time our household purchased those common herbs; each year's harvest is enough to sustain us through the winter until fresh herbs sprout again.

This is a pattern I've followed season after season. When the tomato or pepper production suffered, the herbs were always providing useful crops. When the pumpkins or corn failed to produce adequate quantities, the herbs offered a glimmer of success. This year I decided to expand on that dependability and branch out a little.

Peparing the herbs for drying.
A few weeks ago I harvested bunches of peppermint and lemon balm. I washed them, tied them into small bundles, and hung them to dry in a clean corner of our guest room. Today I took a few sprigs of the dried peppermint, crushed the leaves, and tucked them into my tea ball. After a healthy splash of hot water and a few minutes of steeping, I was rewarded with a fresh cup of peppermint tea. A very good cup of peppermint tea.

Just up the road from us in Boulder, Colorado, is the
Celestial Seasonings tea factory. Every bag of Celestial Seasonings tea that you buy in this country is produced at that plant. They offer free tours and one of the highlights is the mint room. The fragrant oils in mint are so powerful that they'll affect the taste of the other tea ingredients stored in the warehouse so they store the mint in its own separate room. It's an overwhelming experience and one that will clear out your sinuses for weeks to come.

A mid-winter delight, when snow blankets the ground, is to sit in front of the fire with my wife and sip a hot cup of mint tea. Traditionally it's a Celestial Seasonings mint tea because we always seem to come home with boxes of it after visiting the factory. The cup I made today, with my own leaves, tasted just like that mid-winter brew. Actually, it tasted a little better because it was from my garden.

I certainly don't intend to put the company out of business and I'll continue to buy many of their other blends, but I was able to replicate one of their successes with one of my own. It felt good.

Mint has been part of my garden for years, but it was usually used as a garnish. In years past I intended to use it for tea, but other gardening chores always seemed to have a higher priority. I grew chamomile for the purpose of making tea, but that fell short too. This year, with focus and determination, I finally fulfilled the goal I set of making a cup of tea from my own harvest. It will be the first of many.

Too often we have plans for our plants and then time and weather intervene and upset the cart. The little successes are what makes gardening so enjoyable and I suggest you find as many successes as you can. Herbs can be the conduit to continued success. I'll continue to experiment with herb blends for tea and see what happens. That's how Celestial Seasonings started. Who knows where it will lead me or you, if you do the same.

Monday, September 27, 2010

Presto It's Pesto

Another gardening dream came true. For years I've grown basil, an herb that adds aroma to the garden and savory flavor to the palate. In my garden, it's never grown to abundance because I regularly pluck off leaves during the summer to pair with fresh tomatoes and mozarella cheese, a delectable salad when drizzled with balsamic vinegar. I've always wanted to make pesto, but never seemed to have enough basil to fulfill the requirements of standard recipes.

A portion of my herb garden

Today I harvested a large bowl of leaves and immediately made a classic pesto. Some pine nuts, some Turkish extra virgin olive oil that was a gift from my good friend Della, some parmigiano reggiano cheese, some garlic, and the fresh basil combined into a delicious concoction. I sliced off a small piece off crusty ciabatta bread, spread a thick layer of the pesto, took a bite, and promptly soared to heaven.

Gardening brings satisfaction and joy on many levels. Chief among the enjoyment is savoring the moments of harvest when you taste the results of your labor. The warm, ripe tomato fresh from the vine. The sweet, yellow ear of corn. The crunch and flavor of sweet peas. The exploding wetness of strawberries, raspberries, and blackberries. The slobbery mouthful of melon. And now I add the spicy freshness of basil in pesto.

I garden because I enjoy the process. I like planning and planting. I even enjoy fertilizing and weeding. But the process has an end result and that is the harvest. I've had years with only one or two tomatoes being produced. I've seen thousands of apricot blossoms frozen by a spring frost. I've had birds destroy nearly an entire season's supply of apples. I've had many green pumpkins and green tomatoes when the ground is white. Even with results that others might deem as failure, I've persevered and enjoyed doing it all over again.

Enjoying a fresh herb like I did today makes an entire year memorable. There have been many successes in my garden this summer and a few setbacks, but the good memories will remain. My first pesto only happens once. It took years to make it happen and it was well worth it.
Another gardening dream came true. For years I've grown basil, an herb that adds aroma to the garden and savory flavor to the palate. In my garden, it's never grown to abundance because I regularly pluck off leaves during the summer to pair with fresh tomatoes and mozarella cheese, a delectable salad when drizzled with balsamic vinegar. I've always wanted to make pesto, but never seemed to have enough basil to fulfill the requirements of standard recipes.

A portion of my herb garden

Today I harvested a large bowl of leaves and immediately made a classic pesto. Some pine nuts, some Turkish extra virgin olive oil that was a gift from my good friend Della, some parmigiano reggiano cheese, some garlic, and the fresh basil combined into a delicious concoction. I sliced off a small piece off crusty ciabatta bread, spread a thick layer of the pesto, took a bite, and promptly soared to heaven.

Gardening brings satisfaction and joy on many levels. Chief among the enjoyment is savoring the moments of harvest when you taste the results of your labor. The warm, ripe tomato fresh from the vine. The sweet, yellow ear of corn. The crunch and flavor of sweet peas. The exploding wetness of strawberries, raspberries, and blackberries. The slobbery mouthful of melon. And now I add the spicy freshness of basil in pesto.

I garden because I enjoy the process. I like planning and planting. I even enjoy fertilizing and weeding. But the process has an end result and that is the harvest. I've had years with only one or two tomatoes being produced. I've seen thousands of apricot blossoms frozen by a spring frost. I've had birds destroy nearly an entire season's supply of apples. I've had many green pumpkins and green tomatoes when the ground is white. Even with results that others might deem as failure, I've persevered and enjoyed doing it all over again.

Enjoying a fresh herb like I did today makes an entire year memorable. There have been many successes in my garden this summer and a few setbacks, but the good memories will remain. My first pesto only happens once. It took years to make it happen and it was well worth it.

Wednesday, September 15, 2010

It's All Peachy

It's that time of year. Colorado's Palisade peaches are arriving in stores and often on sale. Many of us wait for the opportunity to enjoy local produce, especially when it's a delicious peach. My daughter called last night and announced she's the recipient of 40 pounds of peaches. So what do you do when you have more fruit than you could possibly eat in one sitting? There are many answers to that question.

Canning, jellying, jamming, freezing, and drying are all options to try. My daughter is planning on canning and freezing most of her peaches (and hopefully sharing some with me). This week I juiced about 10 pounds of peaches to make jelly. Then I took the leftover pulp and made fruit leather in the dehydrator. How hard was that? Not at all. The juicing was a piece of cake. I have a steam juicer that converts pounds of cut fruit into cups of crystal-clear juice. You can also simmer fruit and water together for an hour or so and strain the slurry through a jelly bag to achieve the same result. The leftover slurry is spread on a dehydrator tray and dried for about six hours. Cut it into bite-size pieces and it's a great snack.

One pound of peaches provides about one cup of juice to make jelly. Three pounds of peaches makes about three cups of juice. Add that and pectin to five cups of sugar and you'll make five half-pint jars of jelly.

When canning, it takes about one pound of peaches to fill one pint jar. That same basic relationship between weight and volume is pretty constant for most fruit. Forty pounds of fruit will give you 20 quart jars to enjoy throughout the year. When it comes to peaches, that's a lot of golden deliciousness.

If you've never canned or made jam or jelly and are worried about starting now, just freeze your produce. You can cut peaches into slices or halves and freeze them in a bag or plastic container filled with water. You'll want to add one teaspoon of ascorbic acid (vitamin C) to each quart of water to keep the fruit from darkening. Better yet, freeze them in a syrup solution of 30%-40% sugar. Later you can thaw them and pop right on top of your favorite vanilla ice cream or mix them in with your morning oatmeal.

If you're ready to take the plunge and want to can or jelly, there are many resources at your fingertips. I recommend getting a copy of the "Ball Blue Book". It's a book about home preserving that's published by the Ball company; the same one that sells canning jars and lids. It's sold at many stores and all over the internet and should become part of your library. Easy to follow directions will guide you through every step of the process.

There are many videos and recipes online too, but I caution you against many of them if you're just starting out. Preserving food is a serious topic. It's easy and fun, but if you don't do it right you can introduce deadly bacteria and toxins to you and your family. Only use recipes and procedures that are approved by the USDA. State Extension offices offer great assistance in this area too. You can find online fact sheets from Colorado State University here.

I hope this has you thinking about the benefits of home preservation. I love making dozens of jars of pickles, jams, and jellies and giving them out to friends and family at Christmas. Even if you only do it for yourself, you'll love cracking open a jar of delicious peach jelly in January and spreading it on a piece of toast as you look out over your frozen garden. It helps keep the spirit of gardening in your heart.

Enjoy.
It's that time of year. Colorado's Palisade peaches are arriving in stores and often on sale. Many of us wait for the opportunity to enjoy local produce, especially when it's a delicious peach. My daughter called last night and announced she's the recipient of 40 pounds of peaches. So what do you do when you have more fruit than you could possibly eat in one sitting? There are many answers to that question.

Canning, jellying, jamming, freezing, and drying are all options to try. My daughter is planning on canning and freezing most of her peaches (and hopefully sharing some with me). This week I juiced about 10 pounds of peaches to make jelly. Then I took the leftover pulp and made fruit leather in the dehydrator. How hard was that? Not at all. The juicing was a piece of cake. I have a steam juicer that converts pounds of cut fruit into cups of crystal-clear juice. You can also simmer fruit and water together for an hour or so and strain the slurry through a jelly bag to achieve the same result. The leftover slurry is spread on a dehydrator tray and dried for about six hours. Cut it into bite-size pieces and it's a great snack.

One pound of peaches provides about one cup of juice to make jelly. Three pounds of peaches makes about three cups of juice. Add that and pectin to five cups of sugar and you'll make five half-pint jars of jelly.

When canning, it takes about one pound of peaches to fill one pint jar. That same basic relationship between weight and volume is pretty constant for most fruit. Forty pounds of fruit will give you 20 quart jars to enjoy throughout the year. When it comes to peaches, that's a lot of golden deliciousness.

If you've never canned or made jam or jelly and are worried about starting now, just freeze your produce. You can cut peaches into slices or halves and freeze them in a bag or plastic container filled with water. You'll want to add one teaspoon of ascorbic acid (vitamin C) to each quart of water to keep the fruit from darkening. Better yet, freeze them in a syrup solution of 30%-40% sugar. Later you can thaw them and pop right on top of your favorite vanilla ice cream or mix them in with your morning oatmeal.

If you're ready to take the plunge and want to can or jelly, there are many resources at your fingertips. I recommend getting a copy of the "Ball Blue Book". It's a book about home preserving that's published by the Ball company; the same one that sells canning jars and lids. It's sold at many stores and all over the internet and should become part of your library. Easy to follow directions will guide you through every step of the process.

There are many videos and recipes online too, but I caution you against many of them if you're just starting out. Preserving food is a serious topic. It's easy and fun, but if you don't do it right you can introduce deadly bacteria and toxins to you and your family. Only use recipes and procedures that are approved by the
USDA. State Extension offices offer great assistance in this area too. You can find online fact sheets from Colorado State University here.

I hope this has you thinking about the benefits of home preservation. I love making dozens of jars of pickles, jams, and jellies and giving them out to friends and family at Christmas. Even if you only do it for yourself, you'll love cracking open a jar of delicious peach jelly in January and spreading it on a piece of toast as you look out over your frozen garden. It helps keep the spirit of gardening in your heart.

Enjoy.

Monday, September 13, 2010

Your Garden in a Pickle

There's a great way to keep your vegetable garden at your fingertips even after the last plant has withered into the snow. Preserve your garden's bounty through canning, dehydrating, and pickling. It's easy, it's fun, and it allows you to enjoy your produce months after the harvest. I'll discuss canning and dehydrating in future blogs; today it's all about pickles.

This weekend my wife harvested about six pounds of green beans and we set to the task of making my world famous pickled green beans. One pound of vegetables typically makes one quart of pickles. In the past I've used pint jars for my green beans, but this year we opted for the big quart jars. My wife loves them so much that one pint doesn't last long. Now that they're packed into larger jars they may last more than a day when opened.

This week's harvest
You can pickle just about anything. Most of us see vegetables made into pickles, primarily cucumbers, but fruit offers a great option. Pickled apples and pickled peaches are surprisingly tasty. Pickled watermelon rind offers a new perspective on summer harvests. Pears and cantaloupe are also interesting options.


The process and recipes for pickling are very simple. You heat vinegar, an equal measure of water, plus salt and spices, and pour the hot liquid over the vegetables or fruit that is packed into jars. Put on a lid and band and heat it to boiling in a water-filled pot for 5-20 minutes, depending on your altitude. You remove the jars from the hot water, let them cool, store them in a cool place, and enjoy them for months to come. From beginning to end, the task won't take more than a couple hours.

As long as you keep the basic recipe constant -- the vinegar, water, and salt ratios -- you can have fun modifying the other flavors. I take the basic recipe for pickled green beans that is published in a Heinz company pamphlet and add spicy red peppers. The pickled green beans then have a hot bite to them. It's a hit and a favorite of my wife and daughter.

Add sugar to the vinegar and you end up with a sweet pickle. Dill is prevalent in pickled cucumbers, but you can add other savory spices to get extravagant flavors. Add garlic or peppers and you have a spicier taste. Fresh ginger is unique and creates a slightly exotic taste. I like to eat the pickled garlic and pickled ginger after the rest of the jar's contents is consumed.

You don't have to follow the heating process to make pickles. Refrigerator pickles are very easy and often give the pickles a toothier bite... think Vlasic. Take a plastic container or jar, cut up your veggies, pour in vinegar and water with salt and your choice of herbs and spices, put it in the refrigerator overnight, and enjoy delicious pickles the next day. The only downside is that if you don't eat all of the pickles (which rarely happens because they're so tasty), they'll only last about a week or two in the refrigerator. Pickles processed in the heated canning method will last months on the shelf before being opened.

There are many recipes available on the internet and in books. I recommend using a recipe approved by the USDA, or a state extension office. They know what they're doing and the resulting product will be safe to eat.

I became a certified Master Food Safety Advisor through Colorado State University's Extension office a few years ago and have taught many pickling classes. Check with your local county Extension and see what they offer. Canning and pickling classes are happening this time of year and don't cost much to attend. Once you try it you'll likely do it every year.

You can purchase fruit and vegetables from a farmer's market or grocery store to pickle. I like using my own garden's production because it seems to taste a little better knowing I've put my own labor into the result. My favorites are pickling my green beans and asparagus. My cucumbers usually become refrigerator pickles because they're so easy and so delicious and can be made day after day when the cucumbers are being picked.

Now is a great time to act. Check out some recipes, take some of your produce, and make a pickle. Believe me, you'll be hooked.
There's a great way to keep your vegetable garden at your fingertips even after the last plant has withered into the snow. Preserve your garden's bounty through canning, dehydrating, and pickling. It's easy, it's fun, and it allows you to enjoy your produce months after the harvest. I'll discuss canning and dehydrating in future blogs; today it's all about pickles.

This weekend my wife harvested about six pounds of green beans and we set to the task of making my world famous pickled green beans. One pound of vegetables typically makes one quart of pickles. In the past I've used pint jars for my green beans, but this year we opted for the big quart jars. My wife loves them so much that one pint doesn't last long. Now that they're packed into larger jars they may last more than a day when opened.

This week's harvest
You can pickle just about anything. Most of us see vegetables made into pickles, primarily cucumbers, but fruit offers a great option. Pickled apples and pickled peaches are surprisingly tasty. Pickled watermelon rind offers a new perspective on summer harvests. Pears and cantaloupe are also interesting options.


The process and recipes for pickling are very simple. You heat vinegar, an equal measure of water, plus salt and spices, and pour the hot liquid over the vegetables or fruit that is packed into jars. Put on a lid and band and heat it to boiling in a water-filled pot for 5-20 minutes, depending on your altitude. You remove the jars from the hot water, let them cool, store them in a cool place, and enjoy them for months to come. From beginning to end, the task won't take more than a couple hours.

As long as you keep the basic recipe constant -- the vinegar, water, and salt ratios -- you can have fun modifying the other flavors. I take the basic recipe for pickled green beans that is published in a Heinz company pamphlet and add spicy red peppers. The pickled green beans then have a hot bite to them. It's a hit and a favorite of my wife and daughter.

Add sugar to the vinegar and you end up with a sweet pickle. Dill is prevalent in pickled cucumbers, but you can add other savory spices to get extravagant flavors. Add garlic or peppers and you have a spicier taste. Fresh ginger is unique and creates a slightly exotic taste. I like to eat the pickled garlic and pickled ginger after the rest of the jar's contents is consumed.

You don't have to follow the heating process to make pickles. Refrigerator pickles are very easy and often give the pickles a toothier bite... think Vlasic. Take a plastic container or jar, cut up your veggies, pour in vinegar and water with salt and your choice of herbs and spices, put it in the refrigerator overnight, and enjoy delicious pickles the next day. The only downside is that if you don't eat all of the pickles (which rarely happens because they're so tasty), they'll only last about a week or two in the refrigerator. Pickles processed in the heated canning method will last months on the shelf before being opened.

There are many recipes available on the internet and in books. I recommend using a recipe approved by the USDA, or a state extension office. They know what they're doing and the resulting product will be safe to eat.

I became a certified Master Food Safety Advisor through Colorado State University's Extension office a few years ago and have taught many pickling classes. Check with your local county Extension and see what they offer. Canning and pickling classes are happening this time of year and don't cost much to attend. Once you try it you'll likely do it every year.

You can purchase fruit and vegetables from a farmer's market or grocery store to pickle. I like using my own garden's production because it seems to taste a little better knowing I've put my own labor into the result. My favorites are pickling my green beans and asparagus. My cucumbers usually become refrigerator pickles because they're so easy and so delicious and can be made day after day when the cucumbers are being picked.

Now is a great time to act. Check out some recipes, take some of your produce, and make a pickle. Believe me, you'll be hooked.