I have coffee in my garden. Not sipping the hot bitter beverage while seated in an Adirondack chair, watching the birds, as my wife does in the morning, but using actual bits of coffee beans in and on the soil. Coffee grounds and filters are a regular component of my compost pile and now I've added coffee chaff.
My wife and I had the pleasure of meeting Pat and Abby recently. They're the mother and daughter team that manage Purple Mountain Coffee Company in Colorado Springs providing fresh roasted coffee to the eager locals. Pat is an avid, dedicated, and passionate coffee roaster who exploded with enthusiasm as she showed us how her custom-made coffee roaster works.
 |
| Pat's custom coffee roaster |
She showed us the barrels and bags of coffee beans from around the world that she has the pleasure of roasting. And she showed us the barrel filled with chaff, a byproduct of the process. Chaff is the outer skin of the coffee bean that frees itself from the inner bean when roasted. It is flaky and fluffy with a light coffee aroma but offers nothing to the roasted beans so is separated and discarded. I saw it as a gardening opportunity. Pat was very willing to let me take the large, black plastic bag filled with chaff.
 |
| Coffee bean chaff |
The chaff will become part of my compost pile and ultimately my garden soil. It will decompose very quickly due to its small size and light texture and will help the pile turn into compost quickly, but the best part is that it's free and available in large quantities. Pat, and every other coffee roaster, has bags of chaff that is either thrown away or given to eager gardeners.
America's, and much of the world's, favorite morning drink produces huge amounts of discarded organic material. In addition to the chaff from roasters, every day millions of pounds of used coffee grounds are thrown away. Not only is this wasteful, but gardeners who toss away the grounds are missing out on a great gardening opportunity. Recycled coffee adds nitrogen to soil and compost piles.
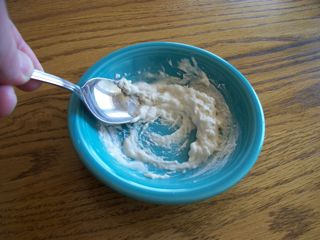
 |
| Collecting the morning filter and grounds |
Chaff is a new opportunity for me while coffee grounds have been a garden staple of mine for years. I've described coffee grounds as one of the near-perfect compost pile additives. It looks like a brown component but improves the pile like a green (see my article "Compost and Your Compost Pile, Part 1" for what that means). It's an easy and quick way to add nitrogen to a compost pile that may be suffering from too much brown. The small size of the grounds help them incorporate throughout the pile and decompose quickly. And they can be gathered in large quantities for free.
Since 1995, Starbucks has supported the corporate policy of "Grounds for Your Garden". Anyone can take home a free 5-pound bag of used grounds. Many Starbucks have a wire rack filled with the bags and you can grab one without even asking. Many other coffee shops have followed suit and offer used grounds for free to anyone who asks.
With the abundance of free used coffee grounds it makes sense to take advantage of the opportunity because coffee can benefit a garden in many ways.
When sprinkled on top the soil coffee grounds act as a slow-release fertilizer. With every rain or watering, a little nitrogen finds its way into the soil as it leaches from the grounds. They also add phosphorus, potassium, magnesium, and copper.
While fresh, unbrewed grounds are acidic and can exacerbate a high-acid, surface soil problem, used, brewed coffee grounds leave most of the acid in the cup you drink. Only slightly acidic, used grounds may benefit alkaline soils a bit, but really don't pose any problems to soil pH. As they decompose and provide food for microorganisms, the grounds will act like any organic material and actually move the pH toward neutral.
For vermicomposting (using worms to compost) using small amounts of used coffee grounds as worm food is also a good idea. Some worm farmers say their worms like coffee. Regardless of their food preference, worms will eat the grounds like any other clean organic matter and produce the wonderful soil additive, worm castings.
Coffee grounds will help deter some garden pests. Slugs and snails don't like the gritty texture of coffee grounds and should avoid areas mulched with them. The coffee grounds should deter cats and send them looking to another cat box. Ants are repelled by the smell of coffee grounds and usually avoid areas where they're scattered.
Like compost tea or worm tea, soaking the used grounds in a bucket of water and using the "coffee tea" on your plants as a foliar feed is a good way of adding nitrogen. While only slightly acidic, acid-loving plants like azaleas, hydrangeas, gardenias, and rhododendrons will enjoy the boost.
If you like the smell of coffee, sprinkle the grounds on the soil throughout your garden. In addition to the benefits above they'll make your garden smell like a coffee shop after a summer rain.
Many people have recognized that the office plants that someone regularly pours a coffee cup into look better than the ones with no coffee additives. That's true. Adding coffee to houseplants provides a nitrogen boost, but if the plant is fed a steady stream of full-strength coffee the acidity will ultimately be detrimental. It's better to supplement normal watering with an occasional addition of diluted coffee. Sprinkling some used grounds on the soil in your pots provides the same benefit during normal watering.
Put coffee in your garden. Find someone like Pat to give you bags of coffee chaff for your compost pile, grab a bag of used coffee grounds from Starbucks or another coffee shop for mulch, and use the filter and grounds from your morning cup of Joe in your compost pile too. It's recycling at its best. Abundant and free, this great organic material will benefit your plants.
I have coffee in my garden. Not sipping the hot bitter beverage while seated in an Adirondack chair, watching the birds, as my wife does in the morning, but using actual bits of coffee beans in and on the soil. Coffee grounds and filters are a regular component of my compost pile and now I've added coffee chaff.
My wife and I had the pleasure of meeting Pat and Abby recently. They're the mother and daughter team that manage Purple Mountain Coffee Company in Colorado Springs providing fresh roasted coffee to the eager locals. Pat is an avid, dedicated, and passionate coffee roaster who exploded with enthusiasm as she showed us how her custom-made coffee roaster works.
|
| Pat's custom coffee roaster |
She showed us the barrels and bags of coffee beans from around the world that she has the pleasure of roasting. And she showed us the barrel filled with chaff, a byproduct of the process. Chaff is the outer skin of the coffee bean that frees itself from the inner bean when roasted. It is flaky and fluffy with a light coffee aroma but offers nothing to the roasted beans so is separated and discarded. I saw it as a gardening opportunity. Pat was very willing to let me take the large, black plastic bag filled with chaff.
|
| Coffee bean chaff |
The chaff will become part of my compost pile and ultimately my garden soil. It will decompose very quickly due to its small size and light texture and will help the pile turn into compost quickly, but the best part is that it's free and available in large quantities. Pat, and every other coffee roaster, has bags of chaff that is either thrown away or given to eager gardeners.
America's, and much of the world's, favorite morning drink produces huge amounts of discarded organic material. In addition to the chaff from roasters, every day millions of pounds of used coffee grounds are thrown away. Not only is this wasteful, but gardeners who toss away the grounds are missing out on a great gardening opportunity. Recycled coffee adds nitrogen to soil and compost piles.
|
| Collecting the morning filter and grounds |
Chaff is a new opportunity for me while coffee grounds have been a garden staple of mine for years. I've described coffee grounds as one of the near-perfect compost pile additives. It looks like a brown component but improves the pile like a green (see my article "Compost and Your Compost Pile, Part 1" for what that means). It's an easy and quick way to add nitrogen to a compost pile that may be suffering from too much brown. The small size of the grounds help them incorporate throughout the pile and decompose quickly. And they can be gathered in large quantities for free.
Since 1995, Starbucks has supported the corporate policy of "Grounds for Your Garden". Anyone can take home a free 5-pound bag of used grounds. Many Starbucks have a wire rack filled with the bags and you can grab one without even asking. Many other coffee shops have followed suit and offer used grounds for free to anyone who asks.
With the abundance of free used coffee grounds it makes sense to take advantage of the opportunity because coffee can benefit a garden in many ways.
When sprinkled on top the soil coffee grounds act as a slow-release fertilizer. With every rain or watering, a little nitrogen finds its way into the soil as it leaches from the grounds. They also add phosphorus, potassium, magnesium, and copper.
While fresh, unbrewed grounds are acidic and can exacerbate a high-acid, surface soil problem, used, brewed coffee grounds leave most of the acid in the cup you drink. Only slightly acidic, used grounds may benefit alkaline soils a bit, but really don't pose any problems to soil pH. As they decompose and provide food for microorganisms, the grounds will act like any organic material and actually move the pH toward neutral.
For vermicomposting (using worms to compost) using small amounts of used coffee grounds as worm food is also a good idea. Some worm farmers say their worms like coffee. Regardless of their food preference, worms will eat the grounds like any other clean organic matter and produce the wonderful soil additive, worm castings.
Coffee grounds will help deter some garden pests. Slugs and snails don't like the gritty texture of coffee grounds and should avoid areas mulched with them. The coffee grounds should deter cats and send them looking to another cat box. Ants are repelled by the smell of coffee grounds and usually avoid areas where they're scattered.
Like compost tea or worm tea, soaking the used grounds in a bucket of water and using the "coffee tea" on your plants as a foliar feed is a good way of adding nitrogen. While only slightly acidic, acid-loving plants like azaleas, hydrangeas, gardenias, and rhododendrons will enjoy the boost.
If you like the smell of coffee, sprinkle the grounds on the soil throughout your garden. In addition to the benefits above they'll make your garden smell like a coffee shop after a summer rain.
Many people have recognized that the office plants that someone regularly pours a coffee cup into look better than the ones with no coffee additives. That's true. Adding coffee to houseplants provides a nitrogen boost, but if the plant is fed a steady stream of full-strength coffee the acidity will ultimately be detrimental. It's better to supplement normal watering with an occasional addition of diluted coffee. Sprinkling some used grounds on the soil in your pots provides the same benefit during normal watering.
Put coffee in your garden. Find someone like Pat to give you bags of coffee chaff for your compost pile, grab a bag of used coffee grounds from Starbucks or another coffee shop for mulch, and use the filter and grounds from your morning cup of Joe in your compost pile too. It's recycling at its best. Abundant and free, this great organic material will benefit your plants.