Gaining a few extra weeks in your growing season might make the difference between harvesting a handful of tomatoes and harvesting a bushel. With a little effort and not much money, you can add weeks to your season on both the front side and the back.
I strongly advocate raised beds if you want an extended season. The soil in raised beds thaws out faster in the spring. After a few recent warm days I tested my soil yesterday. The soil in open areas that receive full sun is still frozen below about two inches. The soil in my raised beds is thawed down to six to eight inches, depending on how much sun they get. Raised beds are also ideal for mini greenhouses.
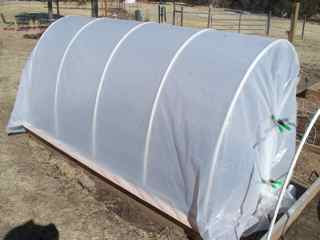 |
| A mini greenhouse over my raised bed. |
A mini green house is a simple structure that is built over the raised bed, or in the garden, and covered with plastic. It lets the sun's rays through during the day and traps radiant heat at night.
Mini greenhouses will warm the soil faster, help retain heat through the night, and protect plants during the variable days of late spring. The last two to three weeks before your last frost date (see my blog "
Know Your Important Garden Dates"; Jan 20, 2011) may still present a few nights where the temperatures drop below freezing. The extra protection makes a big difference;
studies by Colorado State University showed a plastic-covered frame provided three to six degrees of frost protection. That's all you need to plant early and not be worried.
I built my mini greenhouses as "hoop houses" using 1/2" PVC pipe. In my four feet by eight feet raised beds, I installed 3/4" pipe "C" clamps every two feet along the side edges of the bed. Take a 10-feet long PVC pipe and bend it between the clamps. This forms a hoop. An eight-foot long, 1" x 2" board can be screwed to the hoops at the top center to form a backbone that holds them in place.
 |
| The clamps that hold the PVC pipe in place. |
Cover the hoops with a sheet of plastic. Plastic that is 10-feet wide is a perfect fit for the hoops. You want to trim it long enough to fully cover the ends of the mini greenhouse. For an eight-feet long bed, plan your plastic to be at least 14 feet long; that allows an extra three feet on each end that can be folded around to cover the end. I used 16-feet long strips to completely enclose the beds.
I used spring hand clamps at the ends to hold the plastic ends together. If you want the ends to be open for air flow, you can also use clamps to hold the plastic to the hoops or to the raised bed. To help keep the plastic in place during windy conditions, I stapled eight-feet long, 1" x 3" tacking strips to the center sides of the plastic; they hang at the sides of the bed.
 |
| Spring clamps holding the plastic together. |
My mini greenhouses are in place now to warm the soil. As soon as the soil is completely thawed I can start planting cool season plants like peas and lettuce. We'll still have nights below freezing through April, but the extra protection should avoid serious plant damage. To plant, you just slide the plastic off one side; you can clamp it at the top. You can also plant and water from each end without removing the plastic sheet.
If you use ten-feet long PVC pipe, your hoops will be about four feet tall. That should be big enough for most garden plants that need early and late protection. If you want a shorter mini greenhouse, eight-feet long pipe will make hoops about three feet tall.
 |
| Two different sizes of hoops. |
When the days begin to get hot, you'll need to be sure to open the ends of the mini greenhouse when the sun is out. This helps ensure air flow and will keep young plants from frying. Close the ends before the sun goes down to retain the warmth in the soil.
The mini greenhouses should stay covered with plastic until the nights remain warm enough for the plants under the hoops. You can leave the plastic in place throughout the growing season, but it may create too much heat for the plants and can reduce pollination. I remove the plastic in early June when the days and nights are consistently warm. If hail is in the forecast I can quickly bring the plastic out and cover the hoops to prevent plant damage.
If you've matched the size of the plant to the size of the hoop, you can put the plastic back on to extend the growing season on the backside. In late summer and early fall, the mini greenhouses keep the temperatures warm when the nights begin to cool. You should be able to coast through your first frost with the plants protected and buy another couple weeks of harvest.
The total cost for each mini greenhouse was about $20 with supplies from a garden center. The PVC and plastic will gradually break down in the sun, but should last at least two full seasons. That seems to be a good investment for getting much more produce from the garden.
You can see a quick recap of the entire process on this YouTube video I made. Enjoy extending your growing season.
"How to Build a Hoophouse Mini Greenhouse" with Gardener Scott
Gaining a few extra weeks in your growing season might make the difference between harvesting a handful of tomatoes and harvesting a bushel. With a little effort and not much money, you can add weeks to your season on both the front side and the back.
I strongly advocate raised beds if you want an extended season. The soil in raised beds thaws out faster in the spring. After a few recent warm days I tested my soil yesterday. The soil in open areas that receive full sun is still frozen below about two inches. The soil in my raised beds is thawed down to six to eight inches, depending on how much sun they get. Raised beds are also ideal for mini greenhouses.
|
| A mini greenhouse over my raised bed. |
A mini green house is a simple structure that is built over the raised bed, or in the garden, and covered with plastic. It lets the sun's rays through during the day and traps radiant heat at night.
Mini greenhouses will warm the soil faster, help retain heat through the night, and protect plants during the variable days of late spring. The last two to three weeks before your last frost date (see my blog "Know Your Important Garden Dates"; Jan 20, 2011) may still present a few nights where the temperatures drop below freezing. The extra protection makes a big difference; studies by Colorado State University showed a plastic-covered frame provided three to six degrees of frost protection. That's all you need to plant early and not be worried.
I built my mini greenhouses as "hoop houses" using 1/2" PVC pipe. In my four feet by eight feet raised beds, I installed 3/4" pipe "C" clamps every two feet along the side edges of the bed. Take a 10-feet long PVC pipe and bend it between the clamps. This forms a hoop. An eight-foot long, 1" x 2" board can be screwed to the hoops at the top center to form a backbone that holds them in place.
|
| The clamps that hold the PVC pipe in place. |
Cover the hoops with a sheet of plastic. Plastic that is 10-feet wide is a perfect fit for the hoops. You want to trim it long enough to fully cover the ends of the mini greenhouse. For an eight-feet long bed, plan your plastic to be at least 14 feet long; that allows an extra three feet on each end that can be folded around to cover the end. I used 16-feet long strips to completely enclose the beds.
I used spring hand clamps at the ends to hold the plastic ends together. If you want the ends to be open for air flow, you can also use clamps to hold the plastic to the hoops or to the raised bed. To help keep the plastic in place during windy conditions, I stapled eight-feet long, 1" x 3" tacking strips to the center sides of the plastic; they hang at the sides of the bed.
|
| Spring clamps holding the plastic together. |
My mini greenhouses are in place now to warm the soil. As soon as the soil is completely thawed I can start planting cool season plants like peas and lettuce. We'll still have nights below freezing through April, but the extra protection should avoid serious plant damage. To plant, you just slide the plastic off one side; you can clamp it at the top. You can also plant and water from each end without removing the plastic sheet.
If you use ten-feet long PVC pipe, your hoops will be about four feet tall. That should be big enough for most garden plants that need early and late protection. If you want a shorter mini greenhouse, eight-feet long pipe will make hoops about three feet tall.
|
| Two different sizes of hoops. |
When the days begin to get hot, you'll need to be sure to open the ends of the mini greenhouse when the sun is out. This helps ensure air flow and will keep young plants from frying. Close the ends before the sun goes down to retain the warmth in the soil.
The mini greenhouses should stay covered with plastic until the nights remain warm enough for the plants under the hoops. You can leave the plastic in place throughout the growing season, but it may create too much heat for the plants and can reduce pollination. I remove the plastic in early June when the days and nights are consistently warm. If hail is in the forecast I can quickly bring the plastic out and cover the hoops to prevent plant damage.
If you've matched the size of the plant to the size of the hoop, you can put the plastic back on to extend the growing season on the backside. In late summer and early fall, the mini greenhouses keep the temperatures warm when the nights begin to cool. You should be able to coast through your first frost with the plants protected and buy another couple weeks of harvest.
The total cost for each mini greenhouse was about $20 with supplies from a garden center. The PVC and plastic will gradually break down in the sun, but should last at least two full seasons. That seems to be a good investment for getting much more produce from the garden.
You can see a quick recap of the entire process on this YouTube video I made. Enjoy extending your growing season.
"How to Build a Hoophouse Mini Greenhouse" with Gardener Scott


Great idea. Thank you!
ReplyDeleteHi Scott,
ReplyDeleteI just came across this youtube video and followed it back here. Don't know if your still blogging or not but I had a question. Last year I built these hoops for all of my raised tomato beds. Had seed started indoors and moved the plants out in early May. They had already grown 12" tall. I had re-potted them once inside. The houses were in place and it got below freezing one night and killed everything under them. What do you think the lowest temp is that can still sustain life under a hoop house? I think my biggest problem was the hoops were full of moisture and the plants were wet from it as the sun went down. I was bummed. Luckily I grew several sets of back up plants so I just replanted but it still hurt!
Bushman, sorry to hear of your loss. Hoop houses will gain a few degrees of protection, but may not save the plants during a hard freeze. Colorado State University conducted tests and determined that a hoop house like the one I use provides 2 to 4 degrees of frost protection. That isn't enough to save tomatoes and peppers if temps drop to 28 or below. For my tomatoes that I put out early I like to add an extra layer of protection with a water wall. See more at my other article: Wall O'Water, Aqui-Shield, and Other Season Extenders. With both your plants can survive most spring freezes. Go to: http://gardenerscott.blogspot.com/2011/05/wall-owater-aqui-shield-and-other.html
DeleteYou've certainly got me thinking now after reading your insightful analysis. I can tell you're well informed on this topic. While some of the examples were a bit outside my direct experiences, the overarching message came through loud and clear. Thanks for sharing your perspective - it offers a different way to look at things that I'll be mulling over. tarpaulins
ReplyDeleteExplore the various factors influencing the Geotextile bags price, including material types, sizes, and applications. This comprehensive guide will help you assess your options and make informed decisions based on your specific needs, whether for erosion control, landscape enhancement, or construction projects. Discover pricing trends and tips for obtaining the best value for your investment in geotextile technology.
ReplyDeleteyour article is amazing !
ReplyDeletetarpaulin sheet
The Low density polyethylene price in india are durable, lightweight plastic sheets made from high-density polyethylene. They are highly resistant to impact, moisture, chemicals, and UV rays, making them ideal for industrial, agricultural, construction, and marine applications. Easy to fabricate and fully recyclable, HDPE Sheets offer a versatile and eco-friendly material solution.
ReplyDeleteThe Jumbo bag supplier, also known as bulk bags or FIBC (Flexible Intermediate Bulk Containers), are large, durable bags made from woven polypropylene fabric. Designed for the safe packaging, storage, and transportation of bulk materials, these bags can typically hold substantial weights ranging from 500 to 2,000 kilograms. Renowned for their strength, moisture resistance, and versatility, PP Jumbo Bags are used across various industries, including agriculture, construction, and chemicals. They often feature reinforced lifting loops for easy handling and can be customized to meet specific size and branding requirements. Eco-friendly and reusable, these bags represent an efficient and sustainable packaging solution for businesses looking to optimize their operations.
ReplyDelete