Propagating lilies is easy. Though the image of an eccentric English lord patiently growing rare jungle lilies in a Victorian greenhouse may be intimidating, the reality is that garden lilies can be propagated with very little fuss. Asian lilies, Oriental Lilies, Tiger Lilies, and American hybrids all can be propagated in the garden.
 |
| Beautiful lilies... and I want more |
When cared for and left to themselves, lilies will quickly spread out and can fill a garden bed over the period of a few seasons. When a gardener intervenes to propagate them, the process is accelerated and new plants can be strategically and deliberately placed. Early fall is a good time to propagate lilies.
By their basic nature, lilies want to multiply and have evolved to do so in a number of different ways. Many plants will multiply through just a couple processes, but lilies offer no less than six methods of propagation. All are easy enough for any amateur gardener to undertake.
Propagating lilies by seed is an obvious method, but takes longer than the others. Letting the flowers go to seed and then collecting it is simple, but the plants require more time to fully develop from seed. It may be a few years before you see flowers. Professional growers and dedicated amateurs will cross pollinate different species to collect seed and develop new hybrids. While this may be a fun way to propagate lilies, it isn't something most gardeners need to do, especially since their are better and faster methods.
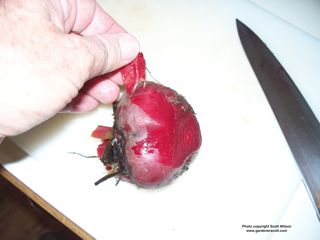
Division is a propagation method most gardeners are familiar with and perfectly suited for lilies. Lilies grow from bulbs. As the plant matures, the bulb grows to a certain size and naturally splits to create a clone. It divides into two bulbs with the divisions called
offsets. Each offset will grow into a separate lily plant. If left alone in the garden, each of the offsets will eventually split into new bulbs. This process eventually results in a clump of lily plants.
Propagating from the first division is easy. You can see this in your garden by looking for two plants emerging from the soil very close to each other. Carefully digging up the plant reveals the two bulbs. They're still connected but are easily separated by hand or with a sharp knife. Each of the individual plants with bulb attached can be planted and will continue to grow. It's best to do this after the plant has flowered so all of the plant's energy will be focused on root development.
 |
| Offsets that are now two plants |
Separating just two offsets works well, but you can also dig up a clump of lilies and carefully separate each bulb for planting. Clumps may not come apart as easily as just two bulbs and often requires cutting apart the thickest sections. To keep your lily bed balanced and healthy, you should divide clumps periodically.
Some species of lilies, particularly Tiger Lilies, offer propagation with
bulbils. Bulbils are small, round, dark-colored, mini bulbs that grow on the plant at the junction of leaves and stems. Each bulbil can be pulled from the plant and planted in the ground. If left in place long enough they may even begin to grow roots and sprout right on the plant. In a natural setting, they fall to the ground and grow where they land. Bulbils will grow faster than seeds. I don't grow Tiger Lilies and haven't tried planting bulbils, but it's about as easy as it gets.
You can also lay a lily stalk with bulbils horizontally on the ground and cover it with soil. A new plant will grow from each bulbil. Remember that not all lily species develop bulbils so if you don't see them don't be upset.
A method I like is propagating with
bulblets. Bulblets are young bulbs that develop underground along the stem root between the primary bulb and the soil surface. Though smaller than mature bulbs, they'll grow into full plants. Dig up the lily, snap off each of the small bulblets growing along the roots, and place the main plant back in the ground. Or you can leave the plant in place and carefully remove the soil below it, digging down to the bulb. Along the way you'll see the little, light bulblets.
 |
| Bulblets on the roots |
The bulblets can be planted pointy end up anywhere you want another plant. Wait until a few weeks after flowering before collecting them; this allows the bulblets to develop and increase in size. Ideally you should have at least two months of temperatures above freezing for the bulblets to begin growing in the soil. You probably won't see any growth above the surface in the fall, but in the spring a new plant should emerge where each bulblet is planted.
 |
| Bulblets all along the stem root |
In cold regions you can harvest the bulblets and grow them over the winter for transplanting in spring. Most lily bulbs require between three and six weeks of cold temperatures before they'll grow leaves. They'll get that naturally outside, but for bulblets that you want to grow inside, place them in a plastic bag and put it in the refrigerator for at least a month before potting them up. Then you can grow them like any household plant before transplanting later.
The fifth method of propagation is with
scales. This method requires a little more effort but is the one that can produce the most new plants from a single parent. Lily bulbs consist of overlapping scales and each scale has the potential of developing into a new plant. Wait until after the plant has flowered to collect scales. Like with bulblets, you can either dig up the plant or carefully remove soil down to the primary bulb. Carefully remove the scales from the outer layer of the main bulb. Removing eight or ten scales from the bulb shouldn't harm a mature lily. When you break off the scales try to ensure you have a section of the bulb base, the
basal plate, attached to each scale. This is where the roots form.
Bulblets also consist of scales. You can collect the bulblets and then separate them into the individual scales but they may not be as developed as scales from the main bulb.
 |
| Lily scales |
After collecting the scales, wash them and place them in a plastic bag filled with moist vermiculite, peat, or potting soil. Place them in a warm, lighted area and in a month or two little bulblets will begin forming along the basal plate. Like with bulblets from along the stem root, cold soaking is needed before leaves and a plant will grow, so after this period of development put the bag in the refrigerator.
 |
| Scales bagged up |
You can also put the scales directly into a moist growing medium with about a third of the pointy end above the surface. Over the course of the same period, bulblets will begin to form. After another month in the cold they'll be ready for potting.
After either of these preparation methods, these new bulblets can be separated from the scale and planted in individual pots. Over the winter the plants will begin growing and should be ready to place in the ground in the spring. Don't expect flowers from these plants in the first year but after a few seasons you won't know which lilies came from scales or bulblets, or full-size bulbs.
The final propagation method is common to many other garden plants. You can propagate using the stems or leaves too. Pull off a leaf with a little stem tissue attached, dip it in rooting hormone, and put in in wet sand or a moist potting soil. Or take a stem piece and do the same. After about a month a little bulb and roots will form. The little bulb can be transplanted and treated as a new plant.
With any propagation method you should start with healthy, disease-free plants. If your lily is infected with a virus, each of the offsets, bulbils, bulblets, or scales will be infected too; viruses are not spread in seed. If you have a diseased plant it's best that you discard it rather than try to propagate it. You can also coat the bulbils, bulblets, and scales with a fungicide before planting if you have a problem with fungus.
For an orderly planting it helps to label the result of the propagation so you know which plant is where. Or you can do as I often do and randomly pick spots for random bulbs, letting chance select the best location. That results in different colors spattered throughout the bed. Either way you'll have ample new plants to fill in bare spots by using any of the easy lily propagation methods.
Propagating lilies is easy. Though the image of an eccentric English lord patiently growing rare jungle lilies in a Victorian greenhouse may be intimidating, the reality is that garden lilies can be propagated with very little fuss. Asian lilies, Oriental Lilies, Tiger Lilies, and American hybrids all can be propagated in the garden.
|
| Beautiful lilies... and I want more |
When cared for and left to themselves, lilies will quickly spread out and can fill a garden bed over the period of a few seasons. When a gardener intervenes to propagate them, the process is accelerated and new plants can be strategically and deliberately placed. Early fall is a good time to propagate lilies.
By their basic nature, lilies want to multiply and have evolved to do so in a number of different ways. Many plants will multiply through just a couple processes, but lilies offer no less than six methods of propagation. All are easy enough for any amateur gardener to undertake.
Propagating lilies by seed is an obvious method, but takes longer than the others. Letting the flowers go to seed and then collecting it is simple, but the plants require more time to fully develop from seed. It may be a few years before you see flowers. Professional growers and dedicated amateurs will cross pollinate different species to collect seed and develop new hybrids. While this may be a fun way to propagate lilies, it isn't something most gardeners need to do, especially since their are better and faster methods.
Division is a propagation method most gardeners are familiar with and perfectly suited for lilies. Lilies grow from bulbs. As the plant matures, the bulb grows to a certain size and naturally splits to create a clone. It divides into two bulbs with the divisions called offsets. Each offset will grow into a separate lily plant. If left alone in the garden, each of the offsets will eventually split into new bulbs. This process eventually results in a clump of lily plants.
Propagating from the first division is easy. You can see this in your garden by looking for two plants emerging from the soil very close to each other. Carefully digging up the plant reveals the two bulbs. They're still connected but are easily separated by hand or with a sharp knife. Each of the individual plants with bulb attached can be planted and will continue to grow. It's best to do this after the plant has flowered so all of the plant's energy will be focused on root development.
|
| Offsets that are now two plants |
Separating just two offsets works well, but you can also dig up a clump of lilies and carefully separate each bulb for planting. Clumps may not come apart as easily as just two bulbs and often requires cutting apart the thickest sections. To keep your lily bed balanced and healthy, you should divide clumps periodically.
Some species of lilies, particularly Tiger Lilies, offer propagation with bulbils. Bulbils are small, round, dark-colored, mini bulbs that grow on the plant at the junction of leaves and stems. Each bulbil can be pulled from the plant and planted in the ground. If left in place long enough they may even begin to grow roots and sprout right on the plant. In a natural setting, they fall to the ground and grow where they land. Bulbils will grow faster than seeds. I don't grow Tiger Lilies and haven't tried planting bulbils, but it's about as easy as it gets.
You can also lay a lily stalk with bulbils horizontally on the ground and cover it with soil. A new plant will grow from each bulbil. Remember that not all lily species develop bulbils so if you don't see them don't be upset.
A method I like is propagating with bulblets. Bulblets are young bulbs that develop underground along the stem root between the primary bulb and the soil surface. Though smaller than mature bulbs, they'll grow into full plants. Dig up the lily, snap off each of the small bulblets growing along the roots, and place the main plant back in the ground. Or you can leave the plant in place and carefully remove the soil below it, digging down to the bulb. Along the way you'll see the little, light bulblets.
|
| Bulblets on the roots |
The bulblets can be planted pointy end up anywhere you want another plant. Wait until a few weeks after flowering before collecting them; this allows the bulblets to develop and increase in size. Ideally you should have at least two months of temperatures above freezing for the bulblets to begin growing in the soil. You probably won't see any growth above the surface in the fall, but in the spring a new plant should emerge where each bulblet is planted.
|
| Bulblets all along the stem root |
In cold regions you can harvest the bulblets and grow them over the winter for transplanting in spring. Most lily bulbs require between three and six weeks of cold temperatures before they'll grow leaves. They'll get that naturally outside, but for bulblets that you want to grow inside, place them in a plastic bag and put it in the refrigerator for at least a month before potting them up. Then you can grow them like any household plant before transplanting later.
The fifth method of propagation is with scales. This method requires a little more effort but is the one that can produce the most new plants from a single parent. Lily bulbs consist of overlapping scales and each scale has the potential of developing into a new plant. Wait until after the plant has flowered to collect scales. Like with bulblets, you can either dig up the plant or carefully remove soil down to the primary bulb. Carefully remove the scales from the outer layer of the main bulb. Removing eight or ten scales from the bulb shouldn't harm a mature lily. When you break off the scales try to ensure you have a section of the bulb base, the basal plate, attached to each scale. This is where the roots form.
Bulblets also consist of scales. You can collect the bulblets and then separate them into the individual scales but they may not be as developed as scales from the main bulb.
|
| Lily scales |
After collecting the scales, wash them and place them in a plastic bag filled with moist vermiculite, peat, or potting soil. Place them in a warm, lighted area and in a month or two little bulblets will begin forming along the basal plate. Like with bulblets from along the stem root, cold soaking is needed before leaves and a plant will grow, so after this period of development put the bag in the refrigerator.
|
| Scales bagged up |
You can also put the scales directly into a moist growing medium with about a third of the pointy end above the surface. Over the course of the same period, bulblets will begin to form. After another month in the cold they'll be ready for potting.
After either of these preparation methods, these new bulblets can be separated from the scale and planted in individual pots. Over the winter the plants will begin growing and should be ready to place in the ground in the spring. Don't expect flowers from these plants in the first year but after a few seasons you won't know which lilies came from scales or bulblets, or full-size bulbs.
The final propagation method is common to many other garden plants. You can propagate using the stems or leaves too. Pull off a leaf with a little stem tissue attached, dip it in rooting hormone, and put in in wet sand or a moist potting soil. Or take a stem piece and do the same. After about a month a little bulb and roots will form. The little bulb can be transplanted and treated as a new plant.
With any propagation method you should start with healthy, disease-free plants. If your lily is infected with a virus, each of the offsets, bulbils, bulblets, or scales will be infected too; viruses are not spread in seed. If you have a diseased plant it's best that you discard it rather than try to propagate it. You can also coat the bulbils, bulblets, and scales with a fungicide before planting if you have a problem with fungus.
For an orderly planting it helps to label the result of the propagation so you know which plant is where. Or you can do as I often do and randomly pick spots for random bulbs, letting chance select the best location. That results in different colors spattered throughout the bed. Either way you'll have ample new plants to fill in bare spots by using any of the easy lily propagation methods.