A deer-proof garden is essentially non-existent, but a highly
deer-resistant garden is attainable with a little effort and planning.
One key is to practice “
camouflage gardening“.
Camouflage gardening is the practice of using plants that animals
don’t like to deter them from eating plants that they do like.
Camouflage gardening is mostly focused on deterring deer, but can work
for rabbits, squirrels, and even dogs and cats with appropriate
plantings. I must point out and stress that this
deters animals like deer from eating desirable plants, it
doesn’t prevent them from eating anything.
 |
| Deer exploring my new vegetable garden |
Think of it as constructing a castle or defensive military position.
The plant you want to protect is in the center of the defensive zone.
It’s surrounded by a barrier of deer-resistant plants. For superior
defense you layer zones with additional rings of protection. You’re not
building walls to protect plants but using plants to protect plants.
There are certain plants that deer, and similarly many other animals,
don’t like. Deer tend to avoid plants that are strongly aromatic or
bitter tasting, that have a milky or sticky sap, or that have prickly
leaves or are tough and hairy. When they encounter these plants they
tend to ignore them and move on.
Deer are browsers that amble from plant to plant looking for
something they like. If a plant isn’t on their list of favorites,
they’ll keep looking for one that is. This assumes that they have an
adequate food selection available. When conditions are bad, as in
drought years or when habitat is reduced, they’ll eat almost anything to
stay alive. In spring pregnant does will eat almost anything.
 |
| Deer look everywhere for food |
To get the best protection and to help minimize problems during bad
years, the outside protective zone, which is the first that deer
encounter, would have a plant that is highly resistant to deer. This
layer should have plants that are aromatic with an odor that makes them
walk away. You create a scent barrier that prevents them from smelling
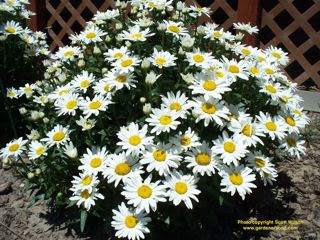
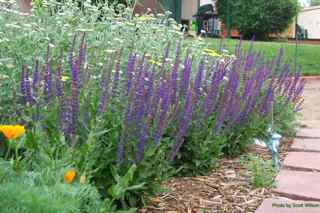
desirable plants. Lavender, mint, salvia, beebalm, rosemary, and cedar
are some plants that have a smell deer avoid and are also rarely eaten.
.jpg) |
| Salvia and yarrow are deterrents |
The second layer of protection would include bad-tasting or toxic
plants. The idea is that if they wander past or through the first
protective zone they’ll come across plants that they don’t want to eat.
Holly, juniper, feathergrass, zinnia, and barberry are rarely eaten.
Plants like elderberry, poppies, bleeding heart, lobelia, and larkspur
can be toxic. When deer encounter these plants they should go in the
opposite direction.
A third layer of protection is to offer a suicide zone. This is a
grouping of fast-growing plants outside the protected area that are less
deer resistant. Honeysuckle, trumpet creeper, morning glory, and
clematis are plants that deer will nibble without decimating the plant.
Flowers that reseed prolifically fit in here too. Planted strategically,
these plants can lead deer away from more desirable beds.
With a simple two-stage protection planting plan, deer will come across
your landscape, realize they don’t like the smells and tastes, and keep
on walking. If they’re curious or extra hungry, they’ll try nibbling on
what they find but if they don’t like it they’ll realize this whole yard
isn’t worth their time and effort and will move on to your neighbor’s
yard. They never make it to the roses or tulips or young fruit tree that
they would devour.
Adding a suicide zone gives them someplace else to go as they walk
away from your garden. They may eat a few clematis or morning glory
flowers as they avoid the aromas and tastes of the other zones. Asters,
petunias, and small sunflowers give them something else to nibble, and
will grow back soon.
 |
| My sunflowers were sacrificial plants |
As you plan a camouflage garden you don’t need to think in terms of
clearly defined rings of plants. The first and second protective zones
can be intermingled, with aromatic plants planted among bitter and toxic
ones. The concept is that one plant deters the deer and when they move
to a second plant it deters them too. Ideally every plant they encounter
within a defined space is a deterrent and they never move through it.
When you have a mix of plants with many deer deterrent properties it
creates a synergy where the entire garden becomes highly effective at
deterring deer. A wide spectrum of aromatic plants can confuse deer to
the point that they seek a more simple, clearly identifiable source of
food… like the big expanse of tulips down the street.
To be most effective camouflage gardening needs to be as year-round
as possible. If the plant you’re hoping to protect blooms or buds before
the others, deer can find it. Your deterrent plants need to be in
position and producing their deterring effect.
For example, for early spring your garden border is planted with
dwarf juniper, rosemary, sage, or artemisia — plants that are still
fragrant even when they’re dormant. A fragrant groundcover like thyme
covers the area. A large planting of daffodils, plants deer typically
don’t eat, brings early color and helps create another deer deterrent
barrier. Irises come next, another plant deer typically don’t eat. At
the center of your display for height and color are your tulips, a plant
that deer love to devour.
Depending on variety, you may have irises and
tulips flowering together which adds extra confusion to the deer. It’s
not a perfect solution. In a good year your tulips are spared; in a very
bad year everything is eaten.
I’m planting my new landscape with entire beds of deterrent plants.
One bed has lavender on one side and various spirea on the other.
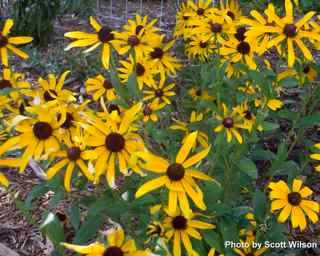
Miscanthus grass provides height and interest. Purple coneflower and
yarrow add color. Apache plume fills the center for added texture color
and interest. It’s highly satisfying to see deer tracks in and around
the bed and not a single plant is disturbed.
Another bed has creeping phlox, artemisia, dwarf pines, salvia,
yucca, columbines, irises, and daffodils; again, there are tracks but no
damage. Next year’s new beds will have similar plantings.
 |
| A young deer walks away from new beds |
We have a resident deer population. They even bed down among the
gambel oak trees in our backyard. I’m hoping that they’ll get used to
encountering so many plants they don’t like that by the time I plant
young trees and a few other less-resistant perennials they’ll have
learned to go some place else for breakfast, lunch, and dinner. Already
I’ve noticed more tracks walking around my deer-resistant beds than
walking through them.
 |
| Some neighbors never go away |
For your camouflage garden, research deer deterrent plants. You won’t
need to sacrifice color, smell, texture, or height. Select plants that
you like to grow normally. Then design your beds and landscape with
those plants as the first barrier. Continue with plantings of other
deer-resistant plants that you want in your landscape. Personalize the
space. You don’t need to grow plants you don’t like.
Camouflage gardening isn’t foolproof. The only sure way to protect
plants is with a physical barrier. For prized plants and young trees a
fence or metal wall is the only sure deer proofing. Used together,
camouflage and wire fences can allow plants that deer like to eat to
become large enough and established to the point they don’t need a
fence.
Camouflage gardening works best in a large landscape or garden with
enough space to allow planting the necessary barrier plants, but even in
small gardens the same principles can be beneficial. Make plants that
deer and other animals avoid your first line of defense. Hide your other
plants with smells and tastes that deter deer. With a little planning
and a lot of luck you may be able to enjoy plants that you’ve had
problems with before.
Check out my video on how to deer proof your garden on my video channel:
https://www.youtube.com/gardenerscott
A deer-proof garden is essentially non-existent, but a highly
deer-resistant garden is attainable with a little effort and planning.
One key is to practice “camouflage gardening“.
Camouflage gardening is the practice of using plants that animals
don’t like to deter them from eating plants that they do like.
Camouflage gardening is mostly focused on deterring deer, but can work
for rabbits, squirrels, and even dogs and cats with appropriate
plantings. I must point out and stress that this deters animals like deer from eating desirable plants, it doesn’t prevent them from eating anything.
|
| Deer exploring my new vegetable garden |
Think of it as constructing a castle or defensive military position.
The plant you want to protect is in the center of the defensive zone.
It’s surrounded by a barrier of deer-resistant plants. For superior
defense you layer zones with additional rings of protection. You’re not
building walls to protect plants but using plants to protect plants.
There are certain plants that deer, and similarly many other animals,
don’t like. Deer tend to avoid plants that are strongly aromatic or
bitter tasting, that have a milky or sticky sap, or that have prickly
leaves or are tough and hairy. When they encounter these plants they
tend to ignore them and move on.
Deer are browsers that amble from plant to plant looking for
something they like. If a plant isn’t on their list of favorites,
they’ll keep looking for one that is. This assumes that they have an
adequate food selection available. When conditions are bad, as in
drought years or when habitat is reduced, they’ll eat almost anything to
stay alive. In spring pregnant does will eat almost anything.
|
| Deer look everywhere for food |
To get the best protection and to help minimize problems during bad
years, the outside protective zone, which is the first that deer
encounter, would have a plant that is highly resistant to deer. This
layer should have plants that are aromatic with an odor that makes them
walk away. You create a scent barrier that prevents them from smelling
desirable plants. Lavender, mint, salvia, beebalm, rosemary, and cedar
are some plants that have a smell deer avoid and are also rarely eaten.
|
| Salvia and yarrow are deterrents |
The second layer of protection would include bad-tasting or toxic
plants. The idea is that if they wander past or through the first
protective zone they’ll come across plants that they don’t want to eat.
Holly, juniper, feathergrass, zinnia, and barberry are rarely eaten.
Plants like elderberry, poppies, bleeding heart, lobelia, and larkspur
can be toxic. When deer encounter these plants they should go in the
opposite direction.
A third layer of protection is to offer a suicide zone. This is a
grouping of fast-growing plants outside the protected area that are less
deer resistant. Honeysuckle, trumpet creeper, morning glory, and
clematis are plants that deer will nibble without decimating the plant.
Flowers that reseed prolifically fit in here too. Planted strategically,
these plants can lead deer away from more desirable beds.
With a simple two-stage protection planting plan, deer will come across
your landscape, realize they don’t like the smells and tastes, and keep
on walking. If they’re curious or extra hungry, they’ll try nibbling on
what they find but if they don’t like it they’ll realize this whole yard
isn’t worth their time and effort and will move on to your neighbor’s
yard. They never make it to the roses or tulips or young fruit tree that
they would devour.
Adding a suicide zone gives them someplace else to go as they walk
away from your garden. They may eat a few clematis or morning glory
flowers as they avoid the aromas and tastes of the other zones. Asters,
petunias, and small sunflowers give them something else to nibble, and
will grow back soon.
|
| My sunflowers were sacrificial plants |
As you plan a camouflage garden you don’t need to think in terms of
clearly defined rings of plants. The first and second protective zones
can be intermingled, with aromatic plants planted among bitter and toxic
ones. The concept is that one plant deters the deer and when they move
to a second plant it deters them too. Ideally every plant they encounter
within a defined space is a deterrent and they never move through it.
When you have a mix of plants with many deer deterrent properties it
creates a synergy where the entire garden becomes highly effective at
deterring deer. A wide spectrum of aromatic plants can confuse deer to
the point that they seek a more simple, clearly identifiable source of
food… like the big expanse of tulips down the street.
To be most effective camouflage gardening needs to be as year-round
as possible. If the plant you’re hoping to protect blooms or buds before
the others, deer can find it. Your deterrent plants need to be in
position and producing their deterring effect.
For example, for early spring your garden border is planted with
dwarf juniper, rosemary, sage, or artemisia — plants that are still
fragrant even when they’re dormant. A fragrant groundcover like thyme
covers the area. A large planting of daffodils, plants deer typically
don’t eat, brings early color and helps create another deer deterrent
barrier. Irises come next, another plant deer typically don’t eat. At
the center of your display for height and color are your tulips, a plant
that deer love to devour.
Depending on variety, you may have irises and
tulips flowering together which adds extra confusion to the deer. It’s
not a perfect solution. In a good year your tulips are spared; in a very
bad year everything is eaten.
I’m planting my new landscape with entire beds of deterrent plants.
One bed has lavender on one side and various spirea on the other.
Miscanthus grass provides height and interest. Purple coneflower and
yarrow add color. Apache plume fills the center for added texture color
and interest. It’s highly satisfying to see deer tracks in and around
the bed and not a single plant is disturbed.
Another bed has creeping phlox, artemisia, dwarf pines, salvia,
yucca, columbines, irises, and daffodils; again, there are tracks but no
damage. Next year’s new beds will have similar plantings.
|
| A young deer walks away from new beds |
We have a resident deer population. They even bed down among the
gambel oak trees in our backyard. I’m hoping that they’ll get used to
encountering so many plants they don’t like that by the time I plant
young trees and a few other less-resistant perennials they’ll have
learned to go some place else for breakfast, lunch, and dinner. Already
I’ve noticed more tracks walking around my deer-resistant beds than
walking through them.
|
| Some neighbors never go away |
For your camouflage garden, research deer deterrent plants. You won’t
need to sacrifice color, smell, texture, or height. Select plants that
you like to grow normally. Then design your beds and landscape with
those plants as the first barrier. Continue with plantings of other
deer-resistant plants that you want in your landscape. Personalize the
space. You don’t need to grow plants you don’t like.
Camouflage gardening isn’t foolproof. The only sure way to protect
plants is with a physical barrier. For prized plants and young trees a
fence or metal wall is the only sure deer proofing. Used together,
camouflage and wire fences can allow plants that deer like to eat to
become large enough and established to the point they don’t need a
fence.
Camouflage gardening works best in a large landscape or garden with
enough space to allow planting the necessary barrier plants, but even in
small gardens the same principles can be beneficial. Make plants that
deer and other animals avoid your first line of defense. Hide your other
plants with smells and tastes that deter deer. With a little planning
and a lot of luck you may be able to enjoy plants that you’ve had
problems with before.
Check out my video on how to deer proof your garden on my video channel:
https://www.youtube.com/gardenerscott


.jpg)
.jpg)


.jpg)
.jpg)